First, a word from MFT:
In 2011, MFT is working harder than ever to inspire you, and we have come up with something we think you'll really enjoy. Our Design Team Creative Challenge is a monthly feature, where we challenge our design team to explore their creative side using a specific theme, product, or technique. This month, we're all making cards featuring Fun Folds! Visit Kim's Blog for a full list of designers that have taken up the challenge!
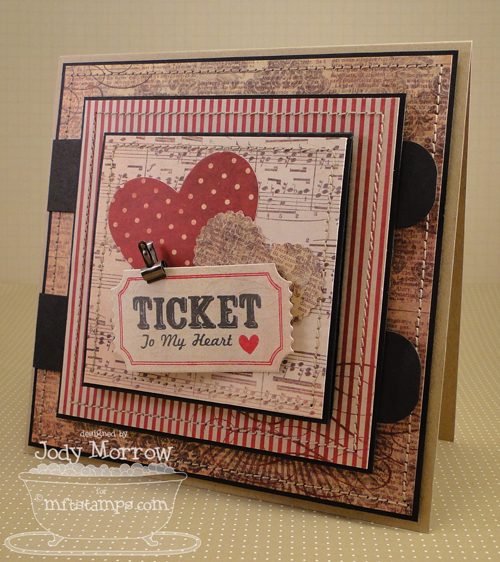
I used the newly released Just the Ticket Die-namics and stamp set, and the Hearts a Plenty Die-namics die. I chose some rich-colored patterned paper from MME, Lost and Found.
The square on top opens up to reveal another message inside.
Then the middle panel opens up to reveal yet another message.
Here is the amazing new Just the Ticket Die-namics and stamp set. It is SO fun to stamp with.
Here is the step-by-step:
- Black CS - 5 1/4 X 5 1/4
- Patterned Paper - 5 1/8 X 5 1/8
- Patterned Paper - 3 X 3 1/2
- (2) Black strips - 6 1/4 X 1, scored at 1
Put adhesive on the inside of the card stock strip as shown.
Adhere to the bottom of the black card stock as shown, then add adhesive to the mid section of the straps as shown.
- Black card stock - 4 1/4 X 4 1/4
- Patterned Paper - 4 1/8 X 4 1/8
- Black card stock - 3 1/4 X 6 1/2, scored at 3 1/4
- Patterned Paper for front - 3 1/8 X 3 1/8
- Die-cut decorations of choice, I used Hearts a Plenty Die-namics
- Stamp decorative accent of choice. I used Just the Ticket Die-namics and stamp set
Finish "mini card" inside and out as shown. The finished size of this card is 3 1/4" square.
Here is a shot of the inside of the mini card.
Add dimensionals to the back of the mini card and adhere to the front of the card.
Decorate inside of the card as shown.
Attach entire piece to a card base using dimensionals. Be sure to use plenty so you don't have any sinking parts on your card.
Now that it is all assembled, add some Basic Grey Magnets if desired to help keep both flaps closed. Here is the top flap.
Here is the middle flap, opened.
And here is the finished card again. I think I'll dub it the Double Flap Fold. :) If you make one, I'd love to see your finished product. Come back and post a link, and I'd appreciate you linking to my tutorial. Thanks!
Thanks for stopping by and I will see you soon! :)


What a neat design, Jody! How creative! And the ticket-theme and colors of the papers give this a neat Vintage carnival look!
ReplyDeleteAwesome card! Love the tutorial! I'll definitely have to try this one! Thanks so much for the inspiration! :)
ReplyDeleteOk, girlie, this is the coolest, most BEAUTIFUL card ever!!! What an amazing design! Thanks for showing us how you made it, I certainly want to try my hands at this design!!!
ReplyDeleteI think this is absolutely brilliant! Fantastic card! Thanks so much for sharing!
ReplyDeleteAWWW...
ReplyDeleteTHIS IS SUCH An I N C R E D I B L E CARD.
Love the Stamps, Papers, stitching, cuts, pop-dotting, etc etc etc... on your card. And thank U so very much for sharing the instructions with us. I'll surely have to make this!!!!
Such an inspiration U R !!
Hugs,
Riti
email: ritibanka@gmail.com
Blog: alilpieceofheaven17.blogspot.com
definitely a fun fold Jody, awesome tutorial!
ReplyDeletewow! this is wonderful Jody. love the papers, all the stamps and hearts you used. sure is a fun fold!
ReplyDeletethis is awesome, Jody, thank you for the tutorial!
ReplyDeletehugs, Alina
Totally fabulous and fun, Jody! Love the sweet design! Thanks for the reminder that I need some boosters ;)
ReplyDeleteI'm speechless (shocking, I know)! But girl, this is amazing! I love it! And the paper you used for it is perfect! WOW!!!
ReplyDeleteVery cool design!!!! Love your card!
ReplyDeleteSo fabulous!! Love all the folds and every little tiny detail!
ReplyDeleteACK! Holy Guacamole! This is AMAZING!!! LOVE LOVE LOVE the fold you used and the papers and stamps are STUNNING!!
ReplyDeleteBeautiful card! And thanks for the great tutorial!
ReplyDeleteGreat design and tutorial!
ReplyDeleteJody,this is a fantastic card and an awesome card fold!!! Love it and great tutorial! Love that ticket set, too :). Thanks for your nice comments on my blog - I appreciate it!!!
ReplyDeleteSoooo fun and cute...even though it IS all lovey dovey and stuff. *snort*
ReplyDeletethis is so cute, love your great card design and dp
ReplyDeleteSo, So, Sooooo cool! I'm going to have to try this! You're awesome :)
ReplyDeleteStunning project Jody! I am for sure going to give this a try, FAB card. Thanks for sharing your tutorial :-D
ReplyDeletexoxo
I just finished making this card and decided to use it (not this particular one,as there are things that need to be fixed lol) for my son's upcoming 17th birthday. You're amazing!
ReplyDelete